

Mountain Walking: Your Ultimate Guide With 3 Essential Steps To Prepare for a Day in the Hills
Although mountain walking in the UK is a relatively safe sport, Mountain Rescue England and Wales report over a thousand incidents most years. It’s estimated that the annual number of injuries is ~650 people per year, with the average number of deaths totalling 34 per year.
Most incidents are caused by poor preparation and could be solved by simply planning the route and taking appropriate clothing and equipment. Because your safety is of utmost importance, we at Maximum Adventure decided to put together this article. Use this article as your ultimate preparation checklist for mountain walking.
- Mountain walking preparation – step #1: Mountain route planning
- Mountain walking preparation – step #2: What to wear in the mountains
- Mountain walking preparation – step #3: What to pack and what to eat
Mountain walking preparation – step #1: Mountain route planning
Get out your OS map, and plot your root. When planning your route, answer the below questions:
- What’s the total ascent of your chosen route?
- How long is your route?
- How fast do you expect to be walking?
- Using the total ascent, distance, and your estimated walking speed, how long do you expect your route will take you?
- What time should you set off to complete your route in daylight hours?
- What are the weather conditions on the day you choose to walk?
Let’s have a look at these questions in more detail and cover how you’d go about answering them.
Question #1: What’s the total ascent of your chosen route?
If you plan to walk a specific peak, then a quick Google search could give you the answer to this one. For instance, we can Google the total ascent of Ben Nevis, which is 1345 metres.
A more accurate measure, however, would be to use your OS map. Let’s come back to our Ben Nevis example to show you how you can do this. The image below shows the route up Ben Nevis via the Tourist Path from Achintee House.

In the image above, the red arrow represents your starting point. If you follow the contour lines from this point (the orange lines) you’ll see the closest marked spot height of 50 metres (circled red). Your start point is below this spot height. How do we know this?
Because each contour line represents an elevation gain of 10 metres. From your starting point to the 50-metre spot height, there are x4 contour lines. This means you’re starting your hike at an elevation of 10 metres (50m-10m).
If we look to where you’re heading, Ben Nevis’s peak stands at a total elevation of 1345 metres. Therefore your total ascent, from your starting point at a 10 metres, is 1335 metres (1345m – 10m).
Question #2: How long is your route?
Referring back to your OS map, it’s easy to estimate your route length. Simply count the number of grid squares (highlighted in red in the image below) your routes spans over.
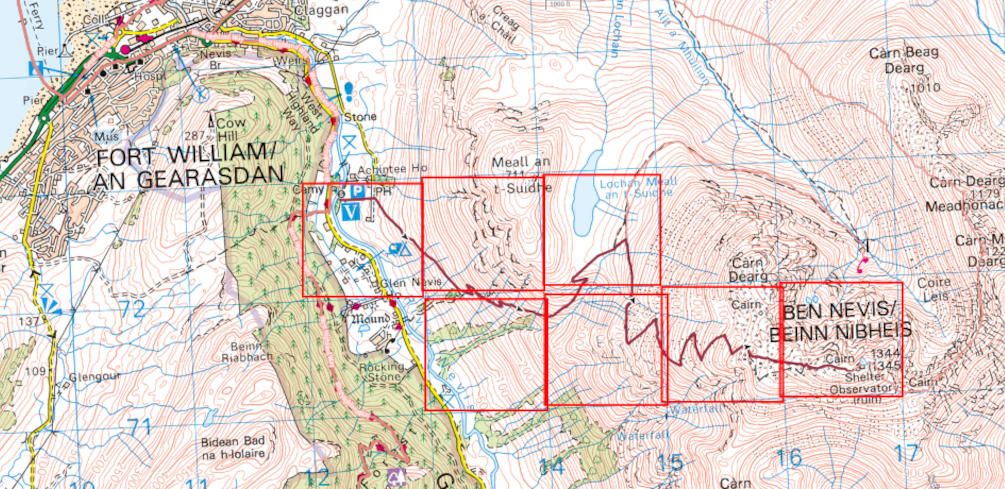
Here, our route spans across 14 squares (accounting for there and back). Each square represents 1km, meaning our route is ~14km (8.6 miles) in total.
Question #3: How fast do you expect to be walking?
This depends on your fitness level, the fitness level of the group (if you’re in a group), and the weather conditions. The average pace for a relatively fit walker is 4km per hour.
For a more accurate measure, why not time yourself on a 1km walk over rough ground. This will give you an average walking speed to apply when planning all your future mountain walks.
Question #4: Using the total ascent, distance, and your estimated walking speed, how long do you expect your route will take you?
So far we know the following information for our mountain walk up Ben Nevis:
- The total ascent is 1335 metres
- The total distance is 14km
- Our walking speed is 4km per hour
Using the total distance of 14km, your walking speed of ~4km per hour, we can estimate how long your mountain walk will take you. 4km per hour equals 1km in 15 minutes. 15 x 14 = 210 minutes. 210 minutes is equal to 3.5 hours.
But wait, we need to factor in your total elevation.
As a general rule, you should add 10 minutes to your total time for every 100 metres of elevation gain. Again, be wary that this time is an approximation and varies from person to person. For a more accurate measure, you should head out and work out the timings for yourself.
Using the general rule, we need to work out how many 100 metres go into our total ascent of 1335 metres. This is 1335/100 = 13.35.
We know every 100 metres equals 10 minutes. 13.35 x 10 minutes = 133.5 minutes.
We, therefore, need to add 133.5 minutes to our current time. 210 minutes + 133.5 minutes = 343.5 minutes, which is equal to 5.7 hours.
Now, you’re unlikely to walk without taking any breaks. Think about how many breaks you’d like to take on your walk, and add this time to your total estimated hiking time. For the sake of this example, we’ll add two 30 minute breaks to our total time. This gives us a hiking time of 6.7 hours.
Finally, let’s round this up to 7 hours as a contingency strategy in case something slows us down on route.
Question #5: What time should you set off to complete your route in daylight hours?
Daylight hours will vary depending on what time of year you’re planning your hike. In the summer months, light is on your side. In the winter months, you need to set off early, as soon as the sun rises, to ensure you’ve plenty of daylight hours to complete your hike.
If we’re planning a new year winter ascent of Ben Nevis, a quick Google search will tell us the sun rises at 08.57 and sets at 15.51. This gives us a daylight window of 7 hours. If we stick to our planned timings, it’s possible to complete our Ben Nevis hike in daylight hours when leaving at 9:00 and arriving back down at ~16:00.
I’d still take a headtorch though for safety purposes, as it’s easy to get caught out and fall behind schedule. Make sure to keep checking your timings on route to ensure you don’t fall behind your planned timings too much.
Question #6: What are the weather conditions on the day you choose to walk?
The weather in the mountains can be unpredictable. You need to be continuously checking the weather a few days before, the night before and in the morning of your trip. Do not head out in adverse, dangerous conditions. Things to look out for are the temperature (how hot/cold it is), wind speed (do not hike when wind speeds are 40km/h or more), cloud cover (this will determine your visibility at the top), and precipitation (how wet are you going to get)!
Too much rain can seep into your clothing, making you uncomfortable and cold. Poor visibility will cause navigational issues on the summit. Cold temperatures are dangerous if you’re unable to keep warm. And high wind speeds will pose a significant hazard when up high and near steep drops.
You can use mountain weather forecast services such as Mountain Weather Information Service the Met Office and Windy to determine the weather conditions for your mountain day. Using a combination of forecast services will give you an overall picture of what the weather is doing before your hike.
Mountain walking preparation – step #2: What to wear in the mountains
Boots are often considered the most important part of your kit. Walking boots not only impact your feet, but on the rest of your body too, and this will have a profound effect on your ability to complete your challenge. Read our boot guide for further information and recommendations on which boot suits which activity.
Several layers of clothing are better to cope with different conditions than one thick heavy layer. You may feel hot whilst walking up a hill but you can be sure you will feel cold when resting, on the top and during your descent later. The beauty of wearing many layers is being able to add or remove each layer when required, allowing you to adjust your body temperature easily.
Essential clothing for completing your mountain walk in winter includes:
- Thermal base layer.
- Mid-layer which should include a fleece and a softshell jacket.
- Waterproofs including a hardshell jacket and waterproof trousers.
- Extra synthetic thermal jacket to put over the top of the rest of your layers.
- Hat and gloves. This includes two or three pairs of gloves for when your current pair gets wet. Also, consider bringing hand warmers.
Essential clothing for completing your mountain walk in the summer includes:
- Cool clothing. Wear t-shirts rather than vest tops to protect your skin from rucksack chafing.
- Mid-layer including a fleece or soft-shell.
- Waterproofs including a hardshell jacket and waterproof trousers.
- Hat and gloves (just in case) as it can get cold in the mountains even in the summer!
- Sun hat.
Mountain walking preparation – step #3: What to pack and what to eat
Pack your bag the night before your big day to ensure you don’t miss anything. Below is a quick checklist you can use to ensure you pack everything you’ll need.
- Map and compass for navigating.
- Layers your not wearing before starting your walk.
- Head torch.
- First aid kit.
- Emergency blanket.
- Mountain whistle.
- Portable phone battery charger.
- Food and drink.
- Walking poles.
The kit also extends to fuelling your body. Keeping your body full of energy is vitally important. For the average walk up Ben Nevis, you can expect to burn an excess of 3000 calories. Bring energy bars, cake, isotonic energy gels and plenty of water. You should be drinking around 12-16 ounces of water to ensure you stay hydrated throughout the day.
Book your mountain walk with Maximum Adventure to ensure a safe and enjoyable adventure
You can book your mountain walk with us here at Maximum Adventure and we’ll do this hard preparation for you. Book onto one of our self-guided walks or a guided mountain ascent.
When you book with us, we’ll send through comprehensive kit lists alongside recommended fuel and fitness plans tailored just for you. Our aim is to help you prepare fully for your challenge ahead, safely!
What are you waiting for? What peak do your dream about standing on top of? At Maximum Adventure, we will work with you to take you there.
How do you prepare for a day of mountain walking? What tips and tricks can you give us that are not covered in this article? We’d love to hear from you, please get in touch. Who knows, you may even get featured in an upcoming article!


